I have not posted for a long time and this is probably my last post on this blog.
Here is the reason ...
I have started my own IT company, which has my complete attention at the moment.
If you are from Slovenia, please visit Računalniške storitve, Miro Maher.
Well, you can of course visit from anywhere, but you will probably not understand because
it is in my Slovenian language.

How to scan dia slides and negatives, correct colors, organize digital pictures archive, share pictures with friends and have fun doing it.
Thursday, November 19, 2015
Wednesday, January 01, 2014
Happy New Year 2014
I wish everyone everywhere that 2014 will be better then 2013 and worse then 2015 !

Monday, December 09, 2013
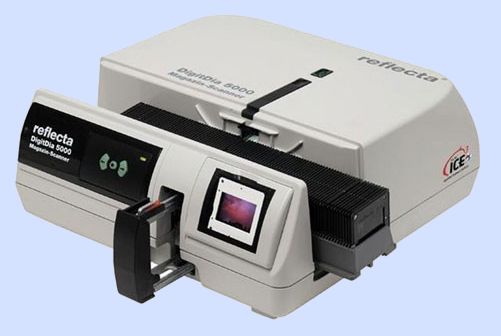
The machine, final evaluation and some statistics
After extremely prolonged vacation (my last post was How tocompile DigiKam 3.2 on Ubuntu in June), it is high time for a new post. And since after 18 months the 6
members of dia scan consortium
using the Reflecta DigitDia 5000 machine managed to scan almost everything and more, it is a good time for some statistics and
final evaluation.

Monday, June 10, 2013
How to compile DigiKam 3.2 on Ubuntu
How to compile DigiKam 3.1 on Ubuntu 12.04 was this blog's most visited post by far, with the sad Tribute to Nord about our Labrador dog, who is not with us anymore, coming second by a close margin in front of digiKam installation and configuration - Part 1. All in all it looks like there is quite some interest about digiKam on Ubuntu or maybe other instructions available online are a bit outdated. Anyway, since 13-May-2013 digikam 3.2 is available and although you can guess how to compile it from comments to this post, it deserves step by step instructions.
update: I successfully tested steps below on Ubuntu versions 12.04, 12.10 and 13.04

update: I successfully tested steps below on Ubuntu versions 12.04, 12.10 and 13.04
Monday, May 06, 2013
Tribute to Nord

I have to use past tense, because after being a family member for eleven and half years Nord is no longer with us. He is not barking at the vacuum cleaner anymore, he is not waiting behind the door and waging his tail when I come home from the job anymore, he is not helping my wife to cook and by the way trying to get some snack anymore, he is not waiting for my daughter to stop studying and take him for a walk anymore and he is not lying at our feet requiring that we stroke him when watching TV in the evening anymore. It is almost one month since Nord is gone and we are slowly recovering from the emptiness we felt in the first days but past moments with our dog are still reappearing in our minds everywhere we go and everywhere we look.
Of course our dog stars on numerous family pictures which are the main topic of this blog. If the pictures were already tagged with digiKam, it would have been much easier for me to find some to publish. Although several megabytes of his pictures in this blog post are only a microscopic piece of several exabytes of data available on the internet today our Nord will now remain a small part of world history for foreseeable future.
Goodbye Nord !


Monday, March 25, 2013
How to compile DigiKam 3.1 on Ubuntu 12.04
Title of my previous post How to install the latest digiKam version on Ubuntu was a little misleading, because the instructions were for digiKam version 2.9 (which was in fact the latest when I started to investigate how to compile it on my Ubuntu) but in the meantime versions 3.0 and soon after 3.1 were officially published by developers. Therefore my post was outdated as soon as it was published. Because of that I promised “I will also try to compile new version and post instructions as soon as possible”. Promise is a promise, so here are instructions how to compile digiKam 3.1 on Ubuntu 12.04.
update: If you want to compile digiKam 3.2 on Ubuntu, I have a new post with instructions here.
update: If you are scanning old dia slides, please check my evaluation of Reflecta DigitDia 5000.

update: If you want to compile digiKam 3.2 on Ubuntu, I have a new post with instructions here.
update: If you are scanning old dia slides, please check my evaluation of Reflecta DigitDia 5000.
Sunday, March 24, 2013
How to install the latest digiKam version on Ubuntu
In DigiKam installation and configuration
(in 4 parts) I suggested it is better to install VMware Player and virtual UbuntuLinux then to use the native digiKam Windows installation.
The advantage is clear, you get a stable solution, but as usually there is also
a disadvantage, you don’t get the latest version. What you get is the version
that was packaged for your Ubuntu version.
 You can get the latest features of
the latest version if you download source code and compile it. Theoretically
that is not a problem, all instructions are available. But there are many
dependencies which must be solved for successful compilation and more often than
not something goes wrong and you get a bunch of errors you have no idea what
they mean unless you are a Linux guru. But even if you are not a Linux guru you
can succeed, read on …
You can get the latest features of
the latest version if you download source code and compile it. Theoretically
that is not a problem, all instructions are available. But there are many
dependencies which must be solved for successful compilation and more often than
not something goes wrong and you get a bunch of errors you have no idea what
they mean unless you are a Linux guru. But even if you are not a Linux guru you
can succeed, read on …
Sunday, February 17, 2013
Digitized picture correction with digiKam – Part 4
In
About picture correction and work optimization
post we have decided to use digiKam and in
DigiKam installation and configuration
(in 4 parts) we have installed and configured digiKam, so we are ready to do some real work. Please keep in mind this is not a manual (you can find that
here).
It is simply a selection of commands that work great for me with detailed explanation and some theoretical background.
Again I managed to write too much for a single post so I had to split it into several parts:
Again I managed to write too much for a single post so I had to split it into several parts:
- In Part 1 I talk about digiKam Image Editor and picture orientation and sizing commands.
- In Part 2 I present some color and histograms theory.
- In Part 3 I go into details of color and brightness correction with "Levels Adjust" command.
- In this part I describe how to achieve good pictures quality without using unreasonable amounts of time.
Digitized picture correction with digiKam – Part 3
In
About picture correction and work optimization
post we have decided to use digiKam and in
DigiKam installation and configuration
(in 4 parts) we have installed and configured digiKam, so we are ready to do some real work. Please keep in mind this is not a manual (you can find that
here).
It is simply a selection of commands that work great for me with detailed explanation and some theoretical background.
Again I managed to write too much for a single post so I had to split it into several parts:
Again I managed to write too much for a single post so I had to split it into several parts:
- In Part 1 I talk about digiKam Image Editor and picture orientation and sizing commands.
- In Part 2 I present some color and histograms theory.
- In this part I go into details of color and brightness correction with "Levels Adjust" command.
- In Part 4 I describe how to achieve good pictures quality without using unreasonable amounts of time.
Digitized picture correction with digiKam – Part 2
In
About picture correction and work optimization
post we have decided to use digiKam and in
DigiKam installation and configuration
(in 4 parts) we have installed and configured digiKam, so we are ready to do some real work. Please keep in mind this is not a manual (you can find that
here).
It is simply a selection of commands that work great for me with detailed explanation and some theoretical background.
Again I managed to write too much for a single post so I had to split it into several parts:
Again I managed to write too much for a single post so I had to split it into several parts:
- In Part 1 I talk about digiKam Image Editor and picture orientation and sizing commands.
- In this part I present some color and histograms theory.
- In Part 3 I go into details of color and brightness correction with "Levels Adjust" command.
- In Part 4 I describe how to achieve good pictures quality without using unreasonable amounts of time.
Monday, February 04, 2013
Digitized picture correction with digiKam – Part 1
In
About picture correction and work optimization
post we have decided to use digiKam and in
DigiKam installation and configuration
(in 4 parts) we have installed and configured digiKam, so we are ready to do some real work. Please keep in mind this is not a manual (you can find that
here).
It is simply a selection of commands that work great for me with detailed explanation and some theoretical background.
Again I managed to write too much for a single post so I had to split it into several parts:
Again I managed to write too much for a single post so I had to split it into several parts:
- In this part I talk about digiKam Image Editor and picture orientation and sizing commands.
- In Part 2 I present some color and histograms theory.
- In Part 3 I go into details of color and brightness correction with "Levels Adjust" command.
- In Part 4 I describe how to achieve good pictures quality without using unreasonable amounts of time.
Friday, January 04, 2013
digiKam installation and configuration - Part 4
In the post
About picture correction and work optimization
we have made a decision to use
digiKam
to correct thousands of scanned pictures as effectively as possible. But before we can start using digiKam,
we need to install it and configure some settings. Since we have quite some work to do I have split it into several parts:
- In Part 1 we talk about digiKam installation, then we install VMware Player and Ubuntu Linux on Windows and configure Ubuntu regional settings.
- In Part 2 we install digiKam and talk some more about VMware Player and Ubuntu Linux.
- In Part 3 we copy pictures from Windows to Ubuntu VM and exercise some Ubuntu desktop tweaking.
- In this post we configure some of digiKam's settings and picture editor keyboard shortcuts.
digiKam installation and configuration - Part 3
In the post
About picture correction and work optimization
we have made a decision to use
digiKam
to correct thousands of scanned pictures as effectively as possible. But before we can start using digiKam,
we need to install it and configure some settings. Since we have quite some work to do I have split it into several parts:
- In Part 1 we talk about digiKam installation, then we install VMware Player and Ubuntu Linux on Windows and configure Ubuntu regional settings.
- In Part 2 we install digiKam and talk some more about VMware Player and Ubuntu Linux.
- In this post we copy pictures from Windows to Ubuntu VM and exercise some Ubuntu desktop tweaking.
- In Part 4 we configure some of digiKam's settings and picture editor keyboard shortcuts.
digiKam installation and configuration - Part 2
In the post
About picture correction and work optimization
we have made a decision to use
digiKam
to correct thousands of scanned pictures as effectively as possible. But before we can start using digiKam,
we need to install it and configure some settings. Since we have quite some work to do I have split it into several parts:
- In Part 1 we talk about digiKam installation, then we install VMware Player and Ubuntu Linux on Windows and configure Ubuntu regional settings.
- In this post we install digiKam and talk some more about VMware Player and Ubuntu Linux.
- In Part 3 we copy pictures from Windows to Ubuntu VM and exercise some Ubuntu desktop tweaking.
- In Part 4 we configure some of digiKam's settings and picture editor keyboard shortcuts.
digiKam installation and configuration - Part 1
In the post
About picture correction and work optimization
we have made a decision to use
digiKam
to correct thousands of scanned pictures as effectively as possible. But before we can start using digiKam,
we need to install it and configure some settings. Since we have quite some work to do I have split it into several parts:
- In this post we talk about digiKam installation, then we install VMware Player and Ubuntu Linux on Windows and configure Ubuntu regional settings.
- In Part 2 we install digiKam and talk some more about VMware Player and Ubuntu Linux.
- In Part 3 we copy pictures from Windows to Ubuntu VM and exercise some Ubuntu desktop tweaking.
- In Part 4 we configure some of digiKam's settings and picture editor keyboard shortcuts.
Monday, December 24, 2012
Merry Christmas and Happy New Year

It
is time for presents. I wish all my readers at least as many presents as in
this picture and that one of the boxes contains your dream new photo camera.
Merry
Christmas and all the best in 2013,
Mirc M
update:
 This was inside the smallest package in above picture, my daughter's present to me :)
Do not worry, you do not need to retype, here it is ...
update:
Do not worry, you do not need to retype, here it is ...
Sunday, December 16, 2012
About picture correction and work optimization
As I have written in my post CyberView Settings, scanning is only the beginning. It is completed for me now (I
have freed a lot of space in one of the closets by moving the boxes with slides
to the cellar) and I am concentrating on next two phases: correction and
tagging.
It is time to make a confession; this is the first post that is not “historical memory”. When I am writing this I have already scanned all my slides and negatives; all together almost 6000 pictures. All the posts so far (with exception of “View pictures on TV set”) were about events that happened several months ago, now I am setting myself to present time.
It is time to make a confession; this is the first post that is not “historical memory”. When I am writing this I have already scanned all my slides and negatives; all together almost 6000 pictures. All the posts so far (with exception of “View pictures on TV set”) were about events that happened several months ago, now I am setting myself to present time.
Sunday, November 18, 2012
CyberView settings
Scanning of slides is only the first step (which should be
followed by color correction processing and tagging of pictures) in the process
leading to organized digital pictures archive. As I have already stated in my previous post, I am perfectly satisfied with included CyberView software. This
post is not CyberView manual, you can find a better one here. I will only
describe the settings that I have used and why I have chosen each of them. But
before we come there, I want to describe some basic principles I have followed.
Thursday, November 01, 2012
View pictures on TV set
This post is partially out of sync with others. It is about how to convert digitized pictures for best viewing experience on TV screen. I hope at least some readers will find it useful.
The problem
Several days ago my daughter celebrated her 20th birthday. According to family tradition this means we invited everybody (grandparents, aunts and uncles and their families) to dinner. Since I had just finished scanning my slides, including those of my daughter from her birth until I started to use digital camera, I have decided to prepare a short “historical overview of her life”. It took me almost 2 hours to select approximately 100 pictures out of several 1000, but that is not the theme of this post.Saturday, October 27, 2012
Welcome to the machine
First impression of the machine
It was Friday evening 2 weeks after DHL delivery drama. The Reflecta DigitDia 5000 scanner was delivered to Ljubljana without further surprises and it was standing on the table besides my Mac in all the beauty; therefore Welcome to the machine from legendary Pink Floyd seems a proper greeting.I installed the CyberView software, connected USB and power cables and powered it on. When switched on, the tray moves forward and backward and the changing arm moves in and out several times, obviously testing and calibrating the mechanics. But beware, this device is loud. Our Labrador dog, who does not especially like loud home appliances (besides cats and a small white neighbor’s dog, his biggest enemy is the vacuum cleaner) approached carefully, barked several times, decided it is safer to leave the beast alone and went away to the most distant corner of our apartment. Seconds later my wife and my daughter together declared: you are not going to use this thing here while I am at home! After some negotiation I was allowed to use it until Sunday evening, when the first consortium member (my name starts with M, which assigned me 5th position in the member’s queue) will start using it.
Subscribe to:
Posts (Atom)